Tag: mac

Where is my lost word document?

Mac Word 2008

So. I’m frequently called by people who have lost documents in Microsoft Word. They’ve been working on something important but hadn’t got round to saving it and BOOM it’s gone.

Prevention is always the cure in these situations. If they had saved the document when they created and then saved it whilst working on it, they could always revert back to the most recent copy.

Sometimes if this has happened more than once I can’t help but tut to myself that some people never learn. So it was with a great deal of surprise I found myself in the same situation last week.

I had been working for hours on a new Social Media Strategy for a client of mine and low and behold Word crashed and I realised to my horror that I hadn’t saved it. Not once.

I cautiously relaunched word and it auto-recovered the two other documents I had been working on for the same meeting but not the 5,000 word strategy document. I felt very stupid.

So rather than just give up and start again (it was 2 o’clock in the morning and I had to leave for my meeting at 8 o’clock) I switched to google.

Now I was pretty sure that if Word had recovered two out of three documents then it had surely recovered the third, but where to find it?

The Microsoft help page was useless. I looked at numerous other pages, but it was this page from Indiana University that put me on the right track.

So for Microsoft Office 2008 for Mac you can find all your recovered documents by going to:

user – Documents – Microsoft User Data – Office 2008 Autorecovery

and if it’s saved, as mine fortunately was, then it’ll be in this folder with some innocuous name like ‘Autorecovery save of Document2’.

And remember to save your documents on creation! Prevention is better than cure. It’s a lesson I certainly try to keep to in the future.

Filed under: HelpTagged with: , , , , ,

How to clean your White MacBook Keyboard so it’s sparkly new!

MacBook Keyboard

So my friend @geetheflea tweeted with this question earlier today. Unfortunately for her I was going through my sisters new business plan and so twitter couldn’t have been further from my mind…

A mutual friend @tsmarsh suggested the following technique to her, neatly illustrated by this video:

Fortunately for her I don’t think that the recommended product, Mr Clean’s Magic Eraser, a USA only product is available here in the UK. Although on reflection I am rather nervous that it might be readily available in the pound shops of Holloway… you never know… and if it is, I am sure my friend will have found herself some. (see why here)

Anyway this in principle was not what worried me about the method. It was what follows: he adds a liberal amount of water to the cleaning product before going at it some on his keyboard (albeit a switched off keyboard) but it’s WATER none the less.

Despite the jazzy introductory music that had warmed me to his presentation, I was at this point mentally repeating NO, NO, NO. And the DUH when he mentions he once over did it with the water and had to leave his MacBook to dry over 24 hours!

So. Here is the right way to do it. What you want is the following:

1 Microfibre Cloth (My favourite brand is: e-cloth but any will do. Start from 50p upwards (last forever))

1 Bottle of iKleer Screen Cleaning Fluid (I prefer this but you can just dampen the e-cloth)

(iKlear do a great pack with it all included. You can buy it from Apple for £29.99 (which might seem pricy but I’m still using the same pack I bought three years ago!))

Anyway the most important thing is to make sure that you use a damp cloth, there should be no standing liquid on the keyboard ever, basically use the above video as a guide on how not to clean your keyboard, at least in terms of liquid levels. Oh and of course switch the computer off!

Also you need to take extra care not to be too rough when cleaning, MacBook keyboards have a habit of being a bit fragile, keys can be easy to dislodge and break off, and though the Apple store are often happy to just fix a new one on for you, it’s a pain.

So I hope this helps you avoid such horrible advice (sorry Tom ;-)) and keep your keyboard nice and clean, as well as your computer healthy.

Filed under: HelpTagged with: , ,

Rebuilding Apple Mail Mboxes

So. I use gmail’s IMAP service to collect emails from each of my email accounts. I’ve used the IMAP service since it was introduced, as unlike the POP3 service it ensures that my inboxes, etc, are synced with the cloud and also with the other computers I used, thereby enabling me to sit down at any computer and see the same, identical information.

Unfortunately it is not unusual for these mailboxes to start displaying duplicate emails, which not only makes searching them more difficult (excluding the duplicates presented by the “All Mail” IMAP mailbox) and can eat up a great deal of extra hard drive space, especially when you have tens of thousands of emails spread across multiple accounts.

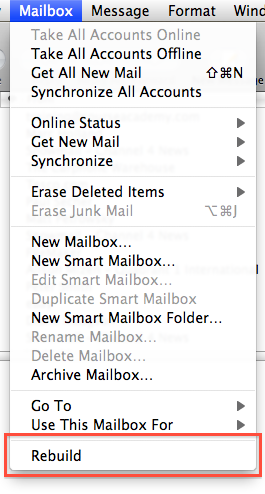
So when this started happening again recently I decided to do something about it. The solution if you use Apple’s Mail program is quite simple. It’s called “Rebuild” and can be found in the “Mailbox” menu of Apple’s Mail program here:

Apple Mailbox Menu
Click the item in the red box

Once you’ve clicked this button Apple’s Mail program will go about the task of rebuilding your mailbox, during which these duplicates emails that have been syncronised to your account will be removed. This process can take a couple of minutes, or a couple of hours depending on the size of your mailbox. I had a couple of thousand messages in the mailbox this afternoon and it was completed before I had finished writing this entry.

Filed under: HelpTagged with: , , , , , ,

Logic Pro, Mainstage go 64 bit

Logic Studio

Logic StudioSo Apple has finally started to update it’s Pro software starting with it’s Logic Pro and Mainstage products. So if you’re a music fan or pro then you’re in luck, you ability to address memory just went up from 4Gb to 64 exabytes (if you can afford that much memory – MacObserver reckons it’d cost approx. $450bn – or buy a machine that will fit it).

For information see Apple’s handy FAQs or specifically Logic Pro or Mainstage.

Filed under: 64 bitTagged with: , ,

Google Apps for Business

So if you haven’t yet made the google apps plunge for your business, the new year is the time to do so.

Despite Google having made the standard edition of google apps more difficult to find (by the way it’s here) I really don’t think that most businesses require more space than is provided for by the free edition; seriously 7gb and growing.

Re-directing your domain couldn’t be easier Google has a simple set of instructions for you to follow. It does involve changing CNAME entries and the like but it really isn’t very difficult and google has some great advice: available here with popular instructions for most domain hosts.

I’d also really advise if you want your employees to be able to easily access your services to set easy to find addresses such as: mail.yourdomain.com, calendar.yourdomain.com, doc.yourdomain.com and sites.yourdomain.com. Google has some easy to follow instructions here.

Uploading your archived email is also pretty easy. For windows users Google has it’s own special uploading program found here. For Mac users once you have setup your email (IMAP is essential) then you can just drag and drop your emails from the old files to the new and wait for the upload process (it can take some time) and you’re done.

For calendars, just export from outlook or ical in the vcal format and you can import your calendar directly to your new google apps calendar. Then share as you like amongst other employees. This is particularly good for office wide holiday calendars and the like, keeping everyone up to date with whats going on.

And really that’s the basic setup. Questions in the comments. Oh and if you need some help please don’t hesitate to drop me a line.

Filed under: GeneralTagged with: , ,

Finally Google Chrome for Mac

Google Chrome

Google ChromeIt’s finally here. Some of you may have been using the developer releases and hacks to get google Chrome working on your Mac, I certainly have, however, it is now possible to get the real versions, albeit with plugins disabled. To join the google love visit: here.

Unfortunately for lots of Mac users google has only made Chrome compatible with Intel chips, which is a real shame as I know a good number of older Mac users who would really benefit from Chrome.

Filed under: GeneralTagged with: , ,

What does it look like?

Every once in a while I get a call like this morning from an old customer, who I no longer have remote access to, running an old version of OS X (10.4 in this instance) and they want me to guide them through a network problem they have (in this instance another computer had hijacked the manual IP used by their Mac) and I struggle to remember what the network settings panel for their version of the OS looks like.

After a quick google I was able to find this very useful website called: www.simplehelp.net which had pictures of what I needed. Though it wasn’t too clear how to navigate them at first (click on the highlighted part of the image) it did provide me with what I needed. So if your offering support I thought I’d post their screenshots for the following OSes:

- Mac OS 10.5

Mac OS 10.4

Unfortunately they don’t have any older examples, or the newer 10.6 (but I’m running that so I don’t need it)

For windows fans (or those poor souls who have to support it :-/) they also have the TCP/IP Settings for the following OSes:

Windows 7

Windows Vista

Windows XP

Windows ME

Windows 2000

So hopefully I won’t need to rely on either my memory or google to get me there again, I can just come here! Phew.

Filed under: GeneralTagged with: , , , , , , ,

Upgrading to VMWare Fusion 3

VMware Fusion 3

VMware Fusion 3So my aunt called me this morning and asked me to pop over and upgrade her VMWare Fusion 2 to the new version 3, which I had persuaded VMWare to give her a free upgrade to, after biting the bullet and buying version 2 as a replacement to parallels one day before the period for which they were offering free upgrades.

The upgrade process for the new program and her virtual machine went like a dream and in a little under twenty minutes after downloading version 3 we were up and running. This is, unfortunately, where the problems with VMWare tools began…

The initial installation ran the VMWare tools installer but it simply didn’t go anywhere and after about twenty minutes of waiting around for it I did some googling and came across this article on the VMWare site that advised me to uninstall the previous version of VMWare tools before proceeding. A few minutes later this was done, but now not even the installer ran.

After some additional googling I learnt that it worked by mounting an ISO to the virtual machine and then the hunt was on for where that file would be locally stored so I could manually burn it to a CD and side step this issue. After a good amount of time I found the ISO was stored here:

Library/Application Support/VMWare Fusion/isoimages/windows.iso

After a little playing around I copied it to a usb and mounted the usb in windows and voila I could now install the VMWare tools successfully. If it hadn’t been for the problem with VMWare tools this upgrade would have been an hour at most job, but as it was it took over two hours (ouch) so if any of you are having the same problem, rest assured that the solution really is quite simple.

Filed under: TechTagged with: , , , ,

Handbreak updates to 64bit

Handbreak

Diligent as you may be sparkle is not always reliable for letting you know when an update is available and it was down to the guys and gals over at TUAW to let me know about the release of the new version of Handbreak (0.9.4), which is now 64bit compatible!

If by chance you haven’t heard of Handbreak before, it’s the leading free, open-source video transcoder available for the Mac (as well as PC and Linux platforms). It can take your .avi files or dvds and turn them into sparkling new mp4 files (with default options including encoding for iTunes, the web and the like) or anything else your heart desires.

I can highly recommend it, though running on a newer Intel Core Duo Chip or above is essential as video transcoding takes a surprising amount of time and the slower your processor the longer it takes!

Anyway find the update here.

Filed under: TechTagged with: , , , , , ,

Psst… Want to Know Some Secrets?

My friend the irresistible @tsmarsh just reminded me of the wonders of custom preference panes for OS X, with this delectable tweet:

@tsmarsh

Sweet! http://tinyurl.com/568fkc Now I can break my mac with the same impunity as the freetards.

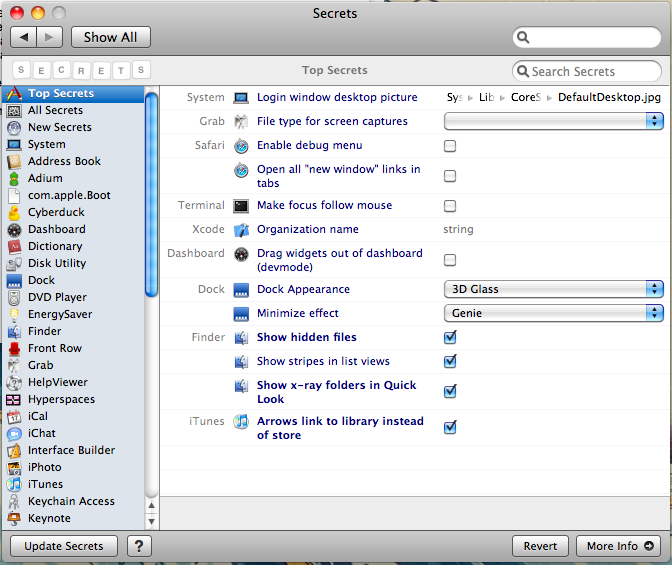
I’ve been using Secrets, the preference pane he’s referring to, since March 2008 after I first stumbled across it via the renowned macosxhints.com site shortly after I believe it was released. It is a cheats way to change ‘secret’ settings in both the OS and other programs for those of us who are sometimes too timid to resort to the terminal or just want to be able to tick a box to apply or more importantly sometimes unapply a secret setting.

It’s exactly the sort of program I love: simple, clean, straightforward, and community driven. It’s open source so if you stumble across a new secret whilst browsing an obscure blog, then you can post it to the site and once verified (I presume) it’ll be added to the program forthwith. If you want to refresh your secrets just click the handy update button and off it goes… reporting back new secrets under the new secret option at the top.

Secrets Preference Pane

The fact that Secrets even exists is proof positive for me that many Apple users don’t always believe the Apple way is the right way and want the ability to easily change some basic fundamental settings of their favourite programs to perform the way that is best for them rather than they way Apple or other program writers have decided is best by default.

So let me let you in on a few of my secret preferences (in no particular order)

  • Mail – Send Windows friendly attachments (why this isn’t activated by default beats me!?)
  • Dictionary – Reuse dictionary definition window (I use dictionary alot, so I like not to have dozens of dictionary windows open, just the one…)
  • Dock – Dim hidden apps (absolutely essential, Apple should have added this feature as a default years ago!)
  • Finder – Enable finder quit menu item (yes finder sometimes I’d like to be able to just quit you, especially when my keyboard is not responding :-()
  • Finder – Use .DS_Stores on network (uncheck and bye bye pesky .DS files!)
  • iTunes – Allow half star ratings (for those songs that just don’t quite make a full five stars!)

These are just a fraction of the customisations I’ve activated so trot along to the Secrets website and join the Mac personalisation revolution now!

Filed under: GeneralTagged with: , , , , , , , , ,