Tag: mac

Making your Mac Safe to Sell

Nuclear Explosion

So. You’ve upgraded your Mac and you’ve decided to sell your old Mac. Just how do you go about removing all your personal data?

Erase Everything! (The Nuclear Option)

If you’re not worried about leaving Apps on for the lucky purchaser or free beneficiary of your new Mac then the best method is the Nuclear option:

1. Boot from the Recovery Disks

2. Open up Disk Utility and select your Hard Drive

3. Pick Erase from the options and then click on “Security Options”

4. You should be fine with selecting the First Option and then hitting Erase

5. But if you want to be MORE secure then options get safer down the list, but…

6. Just remember the more Secure the erase the longer it’ll take, especially for large disks!

A More “select” Erase (The Precision Bombing Option)

If you’re running a newer version of Mac OS than came with your Mac and/or you don’t want the hassle of erasing the disk and then reinstalling the software then this might be the

How To Securely Empty the Trash

First we’ll want to make sure that when we delete stuff Finder is not just removing it’s file location (which makes files easily recoverable for those in the know) but that it’s securely deleting the files by writing over them with gobbledygook.

To do this once all you need to do is add the files to the trash and then go to the Finder Menu and select “Secure Empty Trash…”:
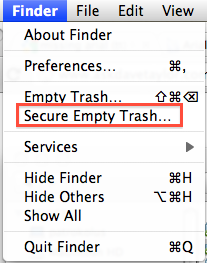
Secure Delete from the Finder Menu

But as we’re probably going to be doing a lot of deleting it’s probably best to go to Finder and set this as the default preference. So if you click on “Preferences” instead of  “Secure Empty Trash…” it’ll bring up this window:
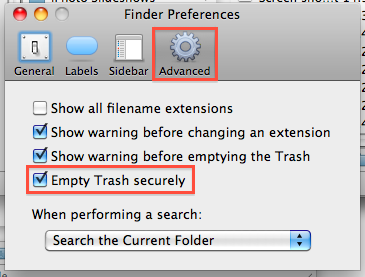
Advanced Finder Preferences

Where you should make sure that the box labelled “Empty Trash Securely” is ticked and now each time we empty the trash as normal it’ll be deleted securely.

Deleting Apps

Most people who sell or gift their Mac leave some if not all of the applications installed, but if you’re deleting any of the apps then you’ll want to make sure that you do it properly, and there is just the app for that, they’ve even been so bold as to tag it “the Uninstaller Apple Forgot”.

AppZapper

AppZapper makes sure that all the little hidden files that an App installs are also deleted. This is especially helpful if you’re uninstalling programs that are available to all users, as these will create preference files, etc, in the root library rather than your user account library. It’s well worth the $12.95 purchase price, and I’m pretty sure that there is a free trial.

I use a version integrated with Hazel that I bought years ago so I haven’t checked).

Don’t Forget System Preferences

If you’ve installed any custom system preferences then to remove them simply launch System Preferences and right-click on the appropriate custom system preference and select “remove preference pane”.

User Files

So you’ve copied all of your user files from the Mac onto a spare hard drive, usb stick or (my personal favourite) your dropbox account and you now want to delete your user data, the best way to do this is to go to Users in System Preferences:
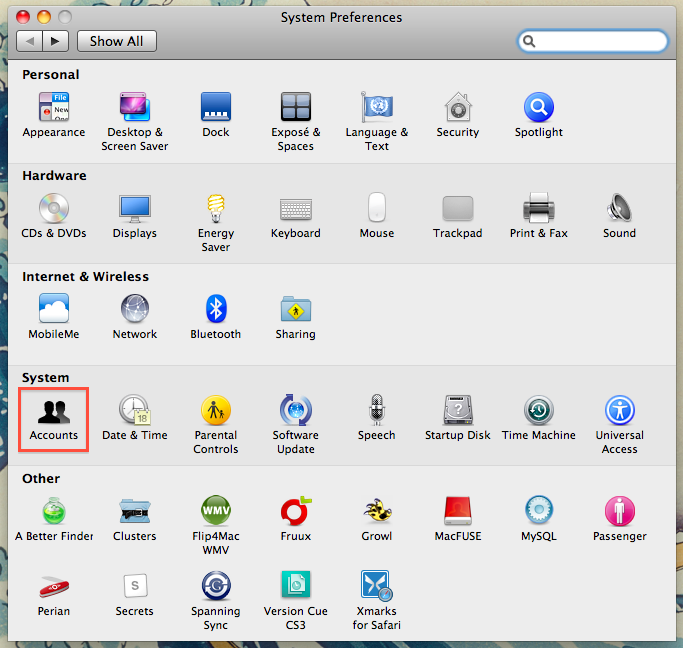
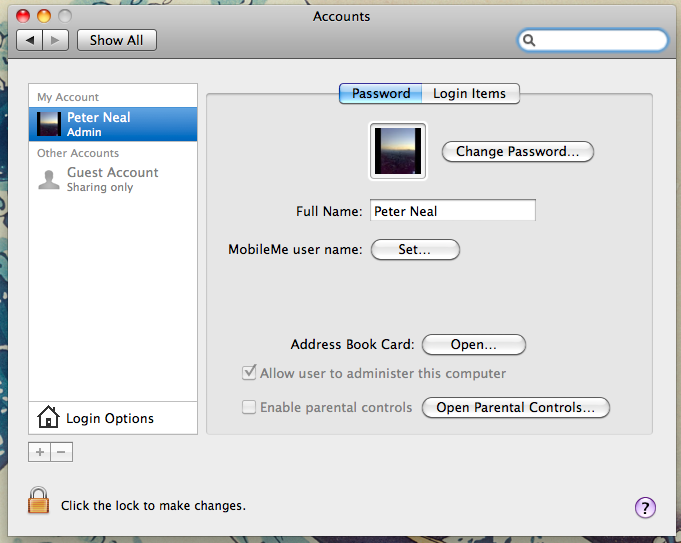
Accounts Preference Pane
Select Accounts Preference Pane
Accounts Preference Settings
Create a New User

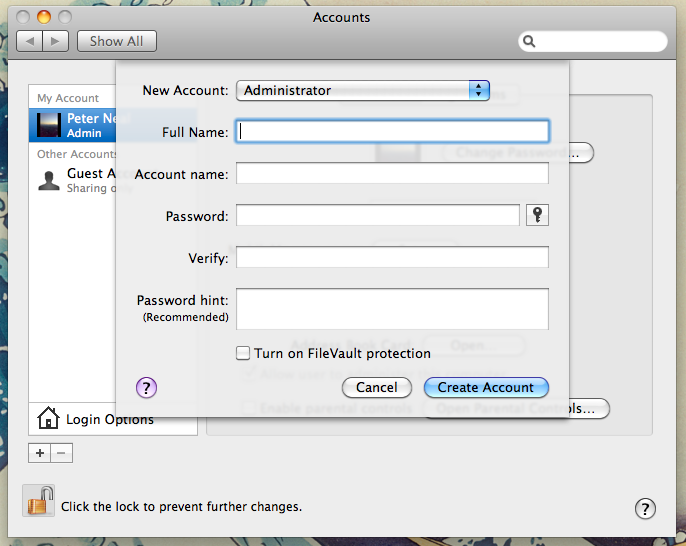
and select accounts. Then if it’s locked as in the above picture you’ll have to unlock it before you proceed so click and enter the password. Then you can select the little + button at the bottom of the User Name list to add a new user, which takes you to this window:

Add New User

Make sure you select a new Administrator account (no it’s not the default) so you’ll have to click on the list and select Administrator like below:
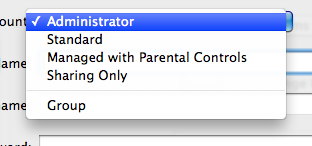
Select Account Type
Select Account Type

Then create a new account administrator account, name it as you like and give it an easy to remember password, say “password’, the new owner can always change it to something better.

Once you’ve created your new account, you can safely log out of your current account and into the new account and once in you go straight back to the Accounts section of the System Preferences. And instead of adding a new account, select your old administrator account and click the – instead of the – and delete your old user account.

Oh and make sure you tell it to delete the user home folder. And that you empty the trash securely.

And you’re done. One “pretty clean” Mac.

Notes for the Security Conscious

PS If you want to be extra cautious once you’ve done this you can use Disk Utility to erase the empty space on your Hard Drive, which will give it another good going over.

PPS This method is itself reasonably secure but the only truly secure way is to opt for the Nuclear Option or even better don’t sell your Mac with the Hard Drive.

Filed under: HelpTagged with: , , , , ,

How to Stop Dates Changing when Cutting and Pasting between Excel Files

So I was moving some old financial records across to a single new excel file in Microsoft Excel 2008 when I noticed that the dates were changing by about four years, perplexed I resorted to a great deal of googling before I came across the reason for this.

In Microsoft Excel 2004 for Mac all Excel files by default used the Microsoft system base date of 01 January 1900 but in Microsoft Excel 2008 for Mac (and onwards) they have changed this to use the Mac system base date of 02 January 1904. Why I’m not sure; standardisation perhaps?

What Microsoft have not done is made this very well known. So if you’re opening an .xls file created in Office for Mac prior to the 2008 version it’ll be using the 1900 base date and if you created an .xls file after this date it’ll be using the the 1904 system. So you’ll have to change it before cutting.

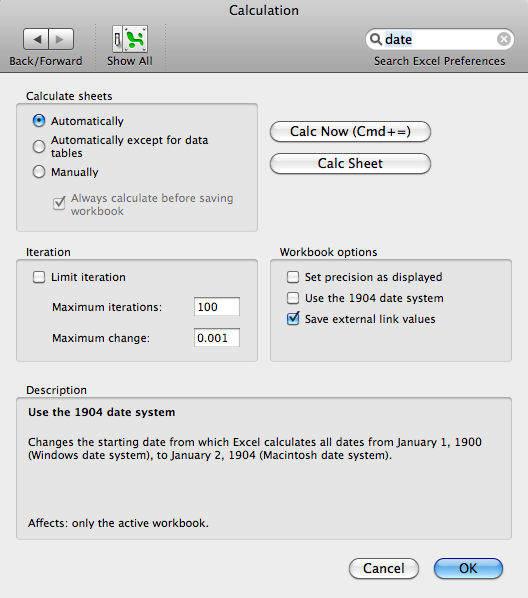
Do in preferences select this setting:

Calculation Preferences Excel for Mac 2008

And then tick this box to use the base 1900 date system:

1904 Base System Date

Unfortunately I am yet to discover a way to change this permanently. :-(

Filed under: HelpTagged with: , , , ,

Navigate Multi-Page PDFs in Container Fields

FileMaker Pro

So if you’ve read my last post, you’ll know I had been searching for and had found the right syntax for adding a QuickTime Movie to a Container Field via a Set Field Script Step, but why was I looking to do this?

Well it’s not because I wanted to store movies in a Container Field, not at all, despite using the “macmovie:/” file path to force the import of my file as a QuickTime Movie, I was in fact importing a .pdf. But why?

Well if you import a .pdf file using this syntax it allows you to view multiple pages of a .pdf rather than just the first page you can see if you import it either as a file or an image.

Now this is really handy if you need to go through some 3,500 invoices to record data from them into a database as you can have the .pdf you’re entering from adjacent to the fields you’re entering data into.

It’s a win-win solution.

Filed under: FilemakerTagged with: , , , ,

Import Quicktime into Container Fields via a Set Script Step

FileMaker Pro

I had some problems finding the correct syntax for this process, so now I have successfully found it I thought I’d share it:

On a Mac: moviemac:/path_to_your_file

On Windows: moviewin:/path_to_your_file

Oh and why might you want to do this? Because if you use the Insert File, Insert Picture or Insert Quicktime Script steps you have to specify a file path manually rather than doing so via a calculation, which is very inconvenient if you need to import say: 3,500 files as needed to.

If you use the Set Field Script Step and specify the appropriate Container Field, with the new contents being your Calculated File Path Field then you can effectively side step this problem. I only need to do this as a temporary measure so it’ll work just fine for my purposes.

If you’re looking for something more permanent you’d have to think about whether or not it stores the file as reference or actually inserts it, which makes a big difference and the answer to which I don’t know (if you DO know or find out please tell us in the comments).

Filed under: FilemakerTagged with: , , , , ,

FileMaker Custom Function for File Path to @Dropbox

FileMaker Pro

From the second version of my first database (back in 2002) I have used my FileMaker databases to control the creation of a structured folder system to enable the efficient and uniform storing of structured data for each of the businesses I have worked with.

Early on in my development of FileMaker systems I stumbled across the fantastic plugins offered by Troi Automatisering, in particular their File Plugin, now at version 5, which I will be creating this custom function to use.

This plugin enables me to create, with relative ease, a series of fields and scripts that allowed the automatic creation and opening of folders and files straight from the database. Relatively simple if you’re running FileMaker in a closed network, but it starts to get more complicated very quickly.

I’ve had the good fortune to design almost exclusively for Mac only networks (phew) although I have had to deal with mixed environments where my customers are still in transition from PCs to Macs so I’ve had to ensure that any system is compatible with both.

The Preparation

Determining the Windows System Version:

Since the route to the Documents folder hasn’t ever changed in Mac OS X I don’t need to worry about the version used, however, this is not the case in Windows where there is a different file path to the “My Documents” folder on Windows XP and the new versions Vista and Windows 7.

So I need to use the Get ( SystemVersion ) Function to determine whether or not the user is using Windows XP or a newer version. According to the FileMaker help the function returns the following information for Windows:

5.1 for Windows XP SP2

6.0 for Windows Vista

So I needed a test for which version of Windows is running. I did attempt to design my own custom function to determine this, but perhaps because I was unwell I wasted a good deal of time messing around with this before I came to my senses and looked at Matt’s github page.

His os.versionName custom function (which I’ve renamed as os.versions) is a quick and easy solution to this problem, which can go well beyond my needs, but will achieve what I want by returning the name of the Mac or Windows OS running on the users system.

It returns a simple easy to interpret name from the Get ( SystemVersion ) so the 5.1 response from the function is returned as “Windows XP” or 6.0 is returned as “Windows Vista”.

Dealing with Windows Folder Path Separators:

Windows file paths use the “\” separator. For some reason you can’t easily use these in FileMaker calculations (if someone knows why please let me know in the comments). So I’ve taken the easy step of creation of new global variable $$windowsnetworksymbol to contain the “\” separator.

n.b. To ensure this variable is set each time the FileMaker file is launched I’ve added it to a script called “Set Global Variables”, which I run as part of my start-up script.

Dealing with Mac Folder Path Separators

Mac file paths used by the plugin are formatted with the “:” separator. The only other thing you need to worry about is that a file path starts without any separator.

Get (DocumentsPath) Function

It is the product of this function that we have been working towards editing. The basic idea is to be able to call the Get ( DocumentsPath ) Function and then edit it’s product to point instead to the location of the Dropbox folder (assuming it is installed in the default location).

The Get ( DocumentsPath ) Function will return the following:

\C:\Documents and Settings\YourUserName\My Documents\ in Windows XP

\C:\Users\Your User Name\Documents\ in Vista or Windows 7

And we know from my earlier blog post: Default @Dropbox File Paths that the default file paths for Dropbox are:

\C:\Documents and Settings\YourUserName\My Documents\My Dropbox\ in Windows XP

\C:\Users\YourUserName\Documents\Dropbox\ in Vista or Windows 7

/Macintosh HD/Users/YourUserName/Dropbox/ in Mac OS X

So now we have all the building blocks in place it’s time to construct our custom function:

The path.dropbox Function

The function itself is relatively simple once we have done the above preparation. It has no parameters and is made up of a simple Case Statement which asks two questions:

1. Is the user running a version of Windows XP?

2. Is the user running either Windows Vista or Windows 7?

If both these questions are negative we will assume that the use is running Mac OS X.

Once we have determined which OS the user is using we will then grab the documents file path using the Get ( DocumentsPath ) Function and then reformat it to be compatible with the Troi File Plugin.

Formatting for Windows

We use the Replace Function to make this assessment:

Replace ( Get ( DocumentsPath ); 1; 3; “” )

This will replace the “\C:” part of the resulting Get ( DocumentsPath ) with simply “”.

We encase this Replace Function within a Substitute Function so that we can substitute the “/” separator for the “\” separator contained within our $$windowsnetworksymbol and get a properly formatted Windows file path for the Troi Plugin. So we get:

Substitute ((Replace (Get(DocumentsPath); 1; 3; “”)); [“/”; $$windowsnetworksymbol])

With both Windows File Paths to the Dropbox we then simply need to append the correct location which we can easily do by adding:

& “My Dropbox” & $$windowsnetworksymbol in Windows XP

& “Dropbox” & $$windowsnetworksymbol in Vista or Windows 7

Formatting for Mac

We again use Replace Function to remove the leading “/” and as before encase this within a Substitute Function so that we can substitute the “/” separator for the “:” separator. So we get:

Substitute ((Replace (Get(DocumentsPath); 1; 1; “”)); [“/”; “:”]; [“Documents:”; “”])

As you’ll notice we have also added to the Substitute Function a statement to replace the “Documents:”, which will strip back the Mac File Path to the User so we can then append:

& “Dropbox” & “:”

which will get us to the default location for the Dropbox on the Mac.

The Final Function:

Case (

os.version = “Windows XP 64-Bit” or “Windows XP”; Substitute ((Replace (Get(DocumentsPath); 1; 3; “”)); [“/”; $$windowsnetworksymbol]) & “My Dropbox” & $$windowsnetworksymbol;
os.version = “Windows 7” or “Windows Vista”; Substitute ((Replace (Get(DocumentsPath); 1; 3; “”)); [“/”; $$windowsnetworksymbol]) & “Dropbox” & $$windowsnetworksymbol;
Substitute ((Replace (Get(DocumentsPath); 1; 1; “”)); [“/”; “:”]; [“Documents:”; “”]) & “Dropbox” & “:”

)

Please note that I have not yet had the opportunity to test this on a Windows system, but I’ve followed paths that worked in the past. As soon as I have had the opportunity to test it I will post any corrections here.

Filed under: FilemakerTagged with: , , , , , , , , , , , ,

Default @Dropbox File Paths

So I needed to know the default file paths for dropbox on the Mac and different versions of Windows for a Filemaker Custom Function I’m building and couldn’t find a simple listing anywhere on the internet so if you’re interested here they are:

Default Dropbox location on Mac OS X:

Macintosh HD/Users/YourUserName/Dropbox/ or more quickly ~/Dropbox

Default Dropbox location on Windows XP:

C:\Documents and Settings\YourUserName\My Documents\My Dropbox\

Default Dropbox location on Windows Vista & 7:

C:\Users\YourUserName\Documents\Dropbox\

Source

I found these from the otherwise helpful dropbox Wiki. Check it our here.

Filed under: HelpTagged with: , , , , , , , , ,

A Disappearing Word Scroll Bar

Mac Word 2008

So a customer called this afternoon with the strangest of problems: the scroll bar in her copy of Word 2008 for the Mac had disappeared.

It seemed a tad strange so I used logmein to remote navigate into the computer and this is what she was seeing:

Word 2008 without a Scroll Bar

As you can see there was no scroll bar.

This is what she was expecting to see:

Word 2008 with a Scroll Bar

As I’ve never seen this before I had to take a look about, but I figured it was probably a view setting that had killed the scroll bar. And true to my expectations it was.

Microsoft Word 2008 View Menu

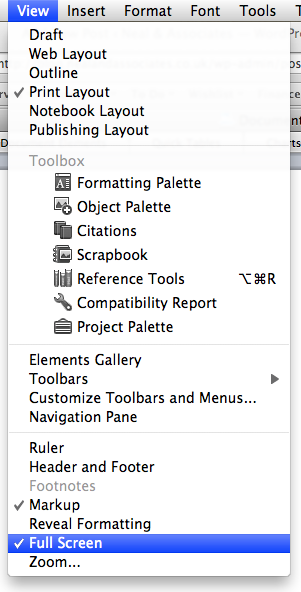
So if you experience this problem you can correct it by going to the view menu (as seen above) and navigate to the “Full Screen” option, and make sure it is un-ticked.

Filed under: HelpTagged with: ,

Data Detectors for Safari on the iPad Please

Safari Logo

Now. I love data detectors. It is one of the most unsung and brilliant of Apple’s innovations with OS X. It just works, although I mourn the fact that it’s not spread much beyond a bare implementation in Mail (a very useful one at that though).

Now with the introduction of the iPad data detectors have taken on a whole new form in their beautiful implimentation of the the Mail on the iPad.

Just click and hold on the address details you are given three options:

Data Detectors in iPad Mail

1. Open in Maps, which finds an address for you in a matter of seconds:

Go to Map in iPad Mail

2. Create a New Contact from the information it’s discovered, which leads you to this:

Add New Contact from iPad Mail

3. Add to an existing contact which brings up a list of your contacts and away you go:

Add to Existing Contact in iPad Mail

I have over a 1000 contacts in my address book, but even then there are gaps, missing addresses, phone numbers, etc, which I can now easily add from a contact.

Now just the other day I was looking up a business on the internet and needed the telephone number and I was thinking how great it’d be if this were implemented in Safari on the iPad (or on my desktop too!) then I could just add all this information to an existing contact or a new contact pretty much instantaneously…

Filed under: GeneralTagged with: , , , , ,

When should I buy a new Mac?

So. You’ve just received a shiny new MBP, then a few weeks later Apple go and release an update. And the couple of thousand you just laid out suddenly doesn’t seem as worthwhile as it did the month before when it arrived.

Anyway help is here: there is a site for that. As Apple normally releases new models at regular intervals Apple Store Check counts down the days between the release cycles and tells you whether or not it is safe to buy a Mac.

Thanks to @danbenjamin for the helpful point in this direction.

Filed under: GeneralTagged with: , ,

This is the sound of silence…

Tap, tap, tap… That’s all I can hear. Yes the sound on my year old MBP has disappeared and all I can here is my own forceful tapping on the keyboard.

Unfortunately this is not the first time this has happened. The first time it drove me nuts. I eventually shut down the computer (which I do rarely) and it solved the problem.

The actual fix is quicker and more simple. Just insert your headphones into the socket and remove them and like magic it seems to kick start the system. Phew. Now you know what to do if it happens to you too.

Filed under: GeneralTagged with: , , ,