Category: Tech

FileMaker Custom Messages for Validation Errors

FileMaker Pro

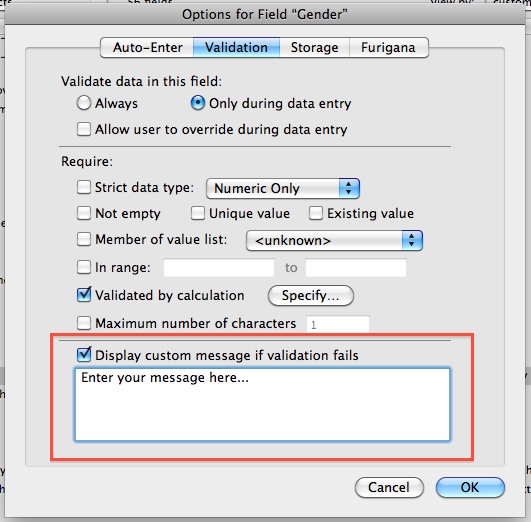
Sometimes you can’t see something because it’s straight in-front of your eyes. So if you’re looking for how to display a custom validation message when validating a field then it’s right at the bottom of the validation pane for that field:

Validation Pane with Custom Notification DialogueAnd yup I had to google to find this out. This is what happens when you have been focusing on your database design for too long!

Unfortunately there is not too much space. So you’re validation message will have to be short but sweet.

Filed under: FilemakerTagged with: , ,

FileMaker Custom Function for File Path to @Dropbox

FileMaker Pro

From the second version of my first database (back in 2002) I have used my FileMaker databases to control the creation of a structured folder system to enable the efficient and uniform storing of structured data for each of the businesses I have worked with.

Early on in my development of FileMaker systems I stumbled across the fantastic plugins offered by Troi Automatisering, in particular their File Plugin, now at version 5, which I will be creating this custom function to use.

This plugin enables me to create, with relative ease, a series of fields and scripts that allowed the automatic creation and opening of folders and files straight from the database. Relatively simple if you’re running FileMaker in a closed network, but it starts to get more complicated very quickly.

I’ve had the good fortune to design almost exclusively for Mac only networks (phew) although I have had to deal with mixed environments where my customers are still in transition from PCs to Macs so I’ve had to ensure that any system is compatible with both.

The Preparation

Determining the Windows System Version:

Since the route to the Documents folder hasn’t ever changed in Mac OS X I don’t need to worry about the version used, however, this is not the case in Windows where there is a different file path to the “My Documents” folder on Windows XP and the new versions Vista and Windows 7.

So I need to use the Get ( SystemVersion ) Function to determine whether or not the user is using Windows XP or a newer version. According to the FileMaker help the function returns the following information for Windows:

5.1 for Windows XP SP2

6.0 for Windows Vista

So I needed a test for which version of Windows is running. I did attempt to design my own custom function to determine this, but perhaps because I was unwell I wasted a good deal of time messing around with this before I came to my senses and looked at Matt’s github page.

His os.versionName custom function (which I’ve renamed as os.versions) is a quick and easy solution to this problem, which can go well beyond my needs, but will achieve what I want by returning the name of the Mac or Windows OS running on the users system.

It returns a simple easy to interpret name from the Get ( SystemVersion ) so the 5.1 response from the function is returned as “Windows XP” or 6.0 is returned as “Windows Vista”.

Dealing with Windows Folder Path Separators:

Windows file paths use the “\” separator. For some reason you can’t easily use these in FileMaker calculations (if someone knows why please let me know in the comments). So I’ve taken the easy step of creation of new global variable $$windowsnetworksymbol to contain the “\” separator.

n.b. To ensure this variable is set each time the FileMaker file is launched I’ve added it to a script called “Set Global Variables”, which I run as part of my start-up script.

Dealing with Mac Folder Path Separators

Mac file paths used by the plugin are formatted with the “:” separator. The only other thing you need to worry about is that a file path starts without any separator.

Get (DocumentsPath) Function

It is the product of this function that we have been working towards editing. The basic idea is to be able to call the Get ( DocumentsPath ) Function and then edit it’s product to point instead to the location of the Dropbox folder (assuming it is installed in the default location).

The Get ( DocumentsPath ) Function will return the following:

\C:\Documents and Settings\YourUserName\My Documents\ in Windows XP

\C:\Users\Your User Name\Documents\ in Vista or Windows 7

And we know from my earlier blog post: Default @Dropbox File Paths that the default file paths for Dropbox are:

\C:\Documents and Settings\YourUserName\My Documents\My Dropbox\ in Windows XP

\C:\Users\YourUserName\Documents\Dropbox\ in Vista or Windows 7

/Macintosh HD/Users/YourUserName/Dropbox/ in Mac OS X

So now we have all the building blocks in place it’s time to construct our custom function:

The path.dropbox Function

The function itself is relatively simple once we have done the above preparation. It has no parameters and is made up of a simple Case Statement which asks two questions:

1. Is the user running a version of Windows XP?

2. Is the user running either Windows Vista or Windows 7?

If both these questions are negative we will assume that the use is running Mac OS X.

Once we have determined which OS the user is using we will then grab the documents file path using the Get ( DocumentsPath ) Function and then reformat it to be compatible with the Troi File Plugin.

Formatting for Windows

We use the Replace Function to make this assessment:

Replace ( Get ( DocumentsPath ); 1; 3; “” )

This will replace the “\C:” part of the resulting Get ( DocumentsPath ) with simply “”.

We encase this Replace Function within a Substitute Function so that we can substitute the “/” separator for the “\” separator contained within our $$windowsnetworksymbol and get a properly formatted Windows file path for the Troi Plugin. So we get:

Substitute ((Replace (Get(DocumentsPath); 1; 3; “”)); [“/”; $$windowsnetworksymbol])

With both Windows File Paths to the Dropbox we then simply need to append the correct location which we can easily do by adding:

& “My Dropbox” & $$windowsnetworksymbol in Windows XP

& “Dropbox” & $$windowsnetworksymbol in Vista or Windows 7

Formatting for Mac

We again use Replace Function to remove the leading “/” and as before encase this within a Substitute Function so that we can substitute the “/” separator for the “:” separator. So we get:

Substitute ((Replace (Get(DocumentsPath); 1; 1; “”)); [“/”; “:”]; [“Documents:”; “”])

As you’ll notice we have also added to the Substitute Function a statement to replace the “Documents:”, which will strip back the Mac File Path to the User so we can then append:

& “Dropbox” & “:”

which will get us to the default location for the Dropbox on the Mac.

The Final Function:

Case (

os.version = “Windows XP 64-Bit” or “Windows XP”; Substitute ((Replace (Get(DocumentsPath); 1; 3; “”)); [“/”; $$windowsnetworksymbol]) & “My Dropbox” & $$windowsnetworksymbol;
os.version = “Windows 7” or “Windows Vista”; Substitute ((Replace (Get(DocumentsPath); 1; 3; “”)); [“/”; $$windowsnetworksymbol]) & “Dropbox” & $$windowsnetworksymbol;
Substitute ((Replace (Get(DocumentsPath); 1; 1; “”)); [“/”; “:”]; [“Documents:”; “”]) & “Dropbox” & “:”

)

Please note that I have not yet had the opportunity to test this on a Windows system, but I’ve followed paths that worked in the past. As soon as I have had the opportunity to test it I will post any corrections here.

Filed under: FilemakerTagged with: , , , , , , , , , , , ,

FileMaker Custom Function for formating Date Separators

FileMaker Pro

I’ve finally created from scratch my own custom function for date formatting, I’ve appropriately called format.date (renaming my earlier format.date custom function to format.versions.date) as all it does is replace the date dividers or separators “.” and “-” with a standard “/”.

So here it is:

format.date (theDate)

Let (

_divider = “/”;

GetAsDate ( Substitute ( thedate; [“.”; _divider]; [“-“; _divider] ))

)

I use it on all my date fields with theDate replaced by the FileMaker Self Function and setup as a date field with an auto-enter calculation that replaces the content, so that I can make sure that I have all dates entered with the correct dividers.

I’ve also submitted it to Brian Dunning’s excellent online repository of custom functions so that I can share it with the world. My first act of giving back (hopefully the first of many).

Filed under: FilemakerTagged with: , , ,

Exporting to vCard from FileMaker

FileMaker Pro

FileMaker doesn’t offer the same level of system integration with OS X as it’s little brother Bento, although it offers more power. It is possible, however, with a little work to extract the data you want to use, in the format you need.

The advantage of being able to export a contact to a vCard is obvious. Once you have the vCard you can then import that vCard into Apple Address Book and from there into your iPhone or your Blackberry, pick your poison.

Oh and you can of course export either one contact record or all of the records.

So how do we do it?

A little googling led me to this post by Simon Page which provides an excellent guide on how to achieve this solution via a custom function, without any plugins.

Like Simon I stored the results in an un-stored calculation field and used the linked XSL stylesheet to facilitate the export. You can find a link to the standard stylesheet here.

My adjustments

I have adjusted his custom function, which I’ve named (following my conventions) export.vcard to add the following available fields in the vCard:

NICKNAME

This is simple enough to achieve:

Add the parameter:

AKA

Add this to the variables:

_Nickname = AKA;

Add this to the formatting for the vCard:

vnickname = _Nickname;

Add this to the final formatting:

“NICKNAME:” & vnickname & “¶” &

PHOTO

I’ve tried this with a series of combinations of the above, with images held in the file as well as stored with a reference to no effect. So I decided to take a look at a vCard from Apple Address Book with TextMate only to discover it’s encoded in base64. So for the moment I’m stuck, but I’ve a few leads, and I’ll update once I’ve found a solution.

BDAY

This is a little more complicated to achieve. You must export the date field in the right format. Here in the UK we format our dates as DD/MM/YYYY but for it to work with the vCard format it needs to be formatted as YYYY/MM/DD, so I created the following custom un-stored calculation field: c_Formatted_Date_of_Birth.

Rather than perform the calculation in the field I heading over to Brian Dunning’s site again and picked out a suitable custom function to allow me to reformat the date I had in my Date_of_Birth field. I chose this one penned by Tim Anderson. And I was able to provide the date in the format I needed. Then I just needed to:

Add the parameter:

DOB

Add this to the variables:

_BDAY = DOB;

Add this to the formatting for the vCard:

vbday = _BDAY;

Add this to the final formatting:

“BDAY:” & vbday & “¶” &

Updates

I’ve not yet completed my final vCard export routine so I’ll update this blog post with more information as I build out the new database. So check back for more.

Filed under: FilemakerTagged with: , , , , , , ,

FileMaker Custom Function for Initials

FileMaker Pro

So in my last blog post you’ll of noticed that I used a custom function called format.initials. I used the function in my calculated field: c_Postal_Name so that I could extract the initials from a name.

Custom functions are a great way to reuse FileMaker code again and perform the same function on multiple fields. There are some great resources out there to help you get started with custom functions, my favourite of which is the custom function section on Brian Dunning’s site (see here).

Rather than re-invent the wheel it is often possible to take someone elses code and adapt it for your own use. In this instance I took a custom function by Ray Cologon of NightWing Enterprises, designed to calculate Acronyms.

Apart from renaming it to suit my naming convention (I name all custom functions by their function, so Ray’s Acronym Function became format.acronym) I just added

& “. “

to the function in each section of the loop and my format.initials custom function was born.

So here it is:

format.initials (name)

/*
Adapted from http://www.briandunning.com/cf/33
*/
If (
WordCount (name) > 1;
Upper ( Left (name; 1)) & “. ” &
format.initials ( RightWords ( name; WordCount (name) -1));
Upper ( Left ( name; 1 )) & “. “
)

You’ll also note that I’ve added a reference to the original custom function I’ve adapted so that it’s properly credited and if I need to reference the original again a few months down the line I can easily do so.

Oh and one note of caution here. If you want to make use of custom functions you’ll need FileMaker Pro Advanced.

Filed under: FilemakerTagged with: ,

The Perfect Calculated Name Field in Filemaker

FileMaker Pro

All database solutions have a basic challenge, which is to present data in the easiest possible format and account for all possible variables.

Once you move over to a database system for contact management as opposed to just the Apple Address Book or Outlook you can use some of this power to better deal with the complexity that contacts can present and thereby provide yourself or your customers with a more complete solution.

Properly formatting names is one of the first things that I dealt with whilst implementing my first Filemaker solution and so when it came to re-building my customer’s database I wanted to make sure that I had taken care of every eventuality.

So what can a name consist of?

1. Forename

2. Middle_Names

3. Surname (or Family Name for those countries that don’t follow the English naming conventions)

This is normally the basic for dealing with the visual display of names within a solution, however, if you want your solution to also take care of names for say printing envelopes (yes some people still send letters) you’ll have to consider:

4. Title

5. Suffix

Now this takes care of the basic fields that you’d need to create in your solution for the average Joe or Jane Bloggs, but there are also some other things to consider:

What if your contact is female and has been married but still uses her maiden name for business correspondence and that’s the context you’ll be contacting her in? You’ll need a field for that:

6. Maiden_Name

So for this contact you’d end up entering data for both her surname and her maiden name, but you’ll want the flexibility to decide whether or not you want that data, so you’ll need a field to capture that choice:

7. Use_Maiden_Name

And what if you need to know your contacts full legal name but in reality you actually refer to them by their nickname as it’s so much easier? You’ll want a field for that:

8. AKA_Name

And again you’ll want maximum flexibility so that you can choose how to display this information, so you’ll need a field to indicate if you want to use that nickname for display in your system:

9. Use_AKA

And that I think covers all the main variables you might have to deal with when considering names (though I’m conscious I’ve ignored titles of nobility, mainly because I haven’t decided how to deal with them yet – future blog post?) So what field types do you choose?

Field Types

All the fields except Use_Maiden_Name and Use_AKA_Name should be text fields. For these two exceptions I simply use a number field, which I use a checkbox in the interface to fill with a 1 if they are to be used, if they are not to be used (the default position) then they remain empty. This leaves the user with the maximum flexibility.

The Calculation

So for the calculation we are obviously going to use a calculated field, I prefer to use an un-stored calculation that minimises the amount of data stored in the database as it is recalculated each time it is needed based on the context of the record being displayed in the database.

The main problem you are going to have to deal with is spacing. A calculation in Filemaker is relatively simple. You take two fields: Forename and Surname and combine them using the following syntax:

Forename & Surname

But this is going to give you the following result: JoeBloggs

So you have to add the space to the calculation:

Forename & ” ” & Surname

Giving you: Joe Bloggs

Naturally you can see once you are dealing with all of these variables your calculation is going to get pretty complicated.

The Old Name Display Calculation

In the system I am replacing the calculation looked like this:


If(IsEmpty(Forename); “”; Trim(Forename) & ” “) &
If(IsEmpty(Surname); “”; Trim(Surname))
If(IsEmpty(Forename); “”; Trim(Forename) & ” “) &If(IsEmpty(Surname); “”; Trim(Surname))

And produced a correctly formatted Mr Joe Bloggs if all the fields were filled.

It uses the simple Filemaker If Statement that allows you say:

if something is true do this, otherwise do that.

It also uses the simple Filemaker IsEmpty Function that allows you to check if the field has any content.

Initial Replacement

Initially I just tried to replicate this function and came up with the following calculation:

Case (

not IsEmpty(Contacts::Use_AKA) and not IsEmpty(Contacts::Use_Maiden); Trim(Contacts::Title & ” ” & Contacts::AKA_Name & ” ” & Contacts::Maiden_Name);

IsEmpty(Contacts::Use_AKA) and not IsEmpty(Contacts::Use_Maiden); Trim(Contacts::Title & ” ” & Contacts::Forename & ” ” & Contacts::Maiden_Name);

not IsEmpty(Contacts::Use_AKA) and IsEmpty(Contacts::Use_Maiden); Trim(Contacts::Title & ” ” & Contacts::AKA_Name & ” ” & Contacts::Surname);

Trim(Contacts::Title & ” ” & Contacts::Forename & ” ” & Contacts::Surname)

)

The FileMaker Case Statement allows you to nest multiple Filemaker If Statements and thereby achieve something more complex and as you can see it’s pretty complicated and difficult to read.

You’ll also notice I used the FileMaker IsEmpty Function in a different way by adding the not in front of the function you’re able to reverse the function to assess when a field is filled rather than empty.

And although it worked in some instances I hadn’t taken account of all of the variables and I came to the conclusion that by using the FileMaker Case Statement I have to repeat each test to get the right result in every context and where to add or remove spaces was also becoming pretty complicated.

So after a little time googling, I came across this blog posting from Skelton Key which explained the power of the FileMaker Let Function. After a little fiddling around I came up with the following calculation:

The Improved Name Display Calculation

Let(

[

title = If( not IsEmpty (Contacts::Title); Trim(Contacts::Title) & ” “; “”);

forename =  If( not IsEmpty (Contacts::Forename); Trim(Contacts::Forename) & ” “; “”);

middlename = If( not IsEmpty (Contacts::Middle_Name); Trim(Contacts::Middle_Name) & ” “; “”);

aka = If( not IsEmpty (Contacts::AKA_Name); Trim(Contacts::AKA_Name) & ” “; “”);

whichname = If( not IsEmpty (Contacts::Use_AKA); aka; forename & middlename);

surname = If( not IsEmpty (Contacts::Use_Maiden); Trim(Contacts::Maiden_Name); Trim(Contacts::Surname));

suffix = If( not IsEmpty (Contacts::Suffix); ” ” & Trim(Contacts::Suffix) ; “”);

result = title & whichname & surname & suffix

];

result

)

As you can see by using the FileMaker Let Function I have been able to break down the calculation into it’s segment components and then put these components together in a more readable and efficient manner.

You’ll also notice that I’m using the FileMaker Trim Function which allows you to remove any extra spaces from a field before you use it to make sure you’re just getting the text you want.

So there it is. My perfect calculated name field for display:

c_Name_Display

Please feel free to copy and use it and if you have improvements you’d like to suggest please do so in the comments.

Oh and before I forget. My perfect calculated name field for post:

c_Name_Postal

The Improved Postal Name Calculation


Let(

[

title = If( not IsEmpty (Contacts::Title); Trim(Contacts::Title) & ” “; “”);
forename =  If( not IsEmpty (Contacts::Forename); format.initials(Contacts::Forename); “”);
middlename = If( not IsEmpty (Contacts::Use_Initials); format.initials(Contacts::Middle_Name); “”);
surname = If( not IsEmpty (Contacts::Use_Maiden); Trim(Contacts::Maiden_Name); Trim(Contacts::Surname));
suffix = If( not IsEmpty (Contacts::Suffix); ” ” & Trim(Contacts::Suffix) ; “”);
result = title & forename & middlename & surname & suffix

];

result

)
Again please feel free to copy and use it and if you have improvements you’d like to suggest please do so in the comments.


Filed under: FilemakerTagged with: , , , , , , ,

Designing Filemaker Databases

FileMaker Pro

I’ve been using Filemaker to design databases for the better part of a decade. I’m by no means a professional database developer, but I’ve been able to easily turn my hand to using Filemaker.

Like most of my skills I’ve picked it up whilst working as a consultant it was mostly due to necessity. It started with a small database to help us track clients and candidates for a recruitment company and grew beyond that to something more complex and helpful.

Now after eight years of using the system I designed the customer has asked me to rebuild it from the ground up. So over the next few weeks I’ll be blogging my way through the redesign, with the type of descriptions I’d of found helpful when I first started developing with FileMaker.

Filed under: FilemakerTagged with: , ,

Translate with Gmail

Gmail

Google TranslateOver the years I’ve consulted for a number of start-up and recently established fashion companies, from manufacturing handbags to shoes, and that has necessitated dealing with a lots of suppliers all over Europe and even as far a field as India and China.

As I only speak English this has created, over the years, a whole number of amusing translation issues, and a generated unfortunately a great deal of communication issues. I wish when I was working on these projects on a more full-time basis I had had access to the facilities of google translate to help iron out these problems.

For those encountering these problems on a daily basis there is a better way than google translate, if you use gmail, which is using the google labs feature allowing you to translate emails directly from within gmail. So if you’re dealing with a supplier get them to sign up for gmail and get them to follow these instructions to enable it.

So here we go for the instructions:

1. Login to your gmail account:

Gmail Login

2. Then click on settings, which you can find in the top right hand corner:

Gmail Settings

3. Then click on the labs option in the settings:

Gmail Labs

4. Then find this option and click on activate:

Google Translate in Gmail5. Once you’ve activated the option then in emails you can activate the translation tool by doing the following:

Activate Gmail TranslateI’d also advise if you are sending an email to a supplier in a foreign country then you should write your email in English and then go to google translate and cut and paste a translation in their language and include it in the email you send with your original English message, thus minimising the likelihood of confusion in sent messages.

Isn’t it great that google is enabling us to communicate better, lets see what the future holds, in the mean time use the above instructions to improve your communications with suppliers abroad.

Filed under: TechTagged with: , ,

Fragmented Google

Like most of us I’ve been the frequent and appreciative beneficiary of the wonderful talents of the Google engineers, however, all too frequently I experience the downsides that are a clear consequence of the fragmented results of a company run by engineers (and sometimes I think for engineers). Take this most recent experience:

At the beginning of last year I setup Google Standard Apps for one of my clients. It is really the perfect solution for practically any business (to be honest though I know some people who pay for the business version I can’t really see the advantage; what SME really needs more than 7gb of email storage per account?).

At the same time I moved them over to my hosting account (only £25 a year inc. setup of the Google Standard Apps) but for the moment that was all she wanted to do, although we discussed re-vamping her website, we decided to leave it for the moment.

So at the end of last year we started to discuss a revamp and over the last few days we have done exactly that. In just a couple of days, with a few adaptions to a free WordPress template (cleanr if you’re interested) and we got the new site up and running. Check it out here if you’d like to take a look.

As part of this process I had to setup Google Analytics for her site and as experience has taught me rather than adding it to my account (after all I’m probably the person most likely to use it for her) I prefer now to set it up in an account in my clients name.

Now my client uses a private msn email address rather than Google. So I had to setup a new Google account for her. It is possible to setup a Google account using another email address so I used her work one (from a Google Standard Apps account) and off I went.

It surprised me that there is no method within the Google Standard Apps account management interface that would allow me to add a Google account for an individual user (or at least an administrator) or to link an existing account in any other way. Just so everything was under one roof so to speak.

It seemed a natural leap for me to assume that if you were going to use Google Apps for your website then you would likely be going to use Google Analytics, Google AdWords, Google AdSense and maybe Google Checkout to think of just a few; all of which you need a Google account for.

In the SME arena (mostly under 25 employees) if you’re a business owner then setting up an additional account for a business is pretty straightforward, though an unnecessary extra step, but if you are hiring someone to do it and you’re not sure what is going on this can place alot of power in the hands of your consultant.

Anyway to get to the point, you have to activate each of these services, individually authenticate them. For example, if you’ve verified your Google Standard Apps account, you still need to verify your Webmasters account, your Analytics account, and so on.

This all adds additional costs, additional time, and additional hassle. It’s the perfect example IMHO of an unnecessarily fragmented service. This seems to be something Google is attempting to solve (see Analytics in AdWords) but it doesn’t seem to be taking the easy route. So come on Google cut us some slack, start integrating your services.

Oh and before I go. Why do we need a separate account for Google Wave?

Filed under: TechTagged with: , , , , , , , , ,

Search Goddamn It…

Google Chrome

I’ve only had Google Chrome installed a few weeks, but it is already changing my browsing habits.

The most evident of which is using the url bar to search. This is perhaps the single most natural development of the browser I have experienced in years. It is becoming, however, quite irritating… and you’ve guessed it: I keep on expecting Safari to search using the same method.

I’ve always considered Apple to be the leading light of software minimalism, after all look at the trouble Steve Jobs went to to get rid of the screws on the Macbook Pro or the edge to edge glass on the new iMac (tablet hint anyone?) so I am puzzled that there has been no adaptation of this Chrome method to Safari.

Come on Apple give me a little New Year cheer and adapt Safari now!

Filed under: TechTagged with: , , ,