Tag: filemaker

Remember to Freeze the Window

FileMaker Pro

Read an interesting post by Chad Novotny at the Support Group this morning (read it here), which pointed out something I have never considered, but I suppose had frequently noticed.

It’s changed the way I think about Looping through Records and is a simple, quick and easy way to improve performance whilst using the Loop Script Step in FileMaker.

So as well as remembering to always click the “Exit after Last” option whilst performing the Go To Next Record/Request/Page:

Exit After Last
Always remember to click the Exit After Last Check Box!

You should also remember to insert a Freeze Window step into the script so that the visual element is turned off as your database loops through a couple of thousand or tens of thousands of records.

A simple easy tip that’ll no doubt save you plenty of time!

Oh and if you’re thinking of other performance gains you can get he also recommends:

1. Performing Loops on a Form View

2. Consider using a dedicated Layout if you’re using Script Triggers.

Filed under: FilemakerTagged with: , ,

Navigate Multi-Page PDFs in Container Fields

FileMaker Pro

So if you’ve read my last post, you’ll know I had been searching for and had found the right syntax for adding a QuickTime Movie to a Container Field via a Set Field Script Step, but why was I looking to do this?

Well it’s not because I wanted to store movies in a Container Field, not at all, despite using the “macmovie:/” file path to force the import of my file as a QuickTime Movie, I was in fact importing a .pdf. But why?

Well if you import a .pdf file using this syntax it allows you to view multiple pages of a .pdf rather than just the first page you can see if you import it either as a file or an image.

Now this is really handy if you need to go through some 3,500 invoices to record data from them into a database as you can have the .pdf you’re entering from adjacent to the fields you’re entering data into.

It’s a win-win solution.

Filed under: FilemakerTagged with: , , , ,

Import Quicktime into Container Fields via a Set Script Step

FileMaker Pro

I had some problems finding the correct syntax for this process, so now I have successfully found it I thought I’d share it:

On a Mac: moviemac:/path_to_your_file

On Windows: moviewin:/path_to_your_file

Oh and why might you want to do this? Because if you use the Insert File, Insert Picture or Insert Quicktime Script steps you have to specify a file path manually rather than doing so via a calculation, which is very inconvenient if you need to import say: 3,500 files as needed to.

If you use the Set Field Script Step and specify the appropriate Container Field, with the new contents being your Calculated File Path Field then you can effectively side step this problem. I only need to do this as a temporary measure so it’ll work just fine for my purposes.

If you’re looking for something more permanent you’d have to think about whether or not it stores the file as reference or actually inserts it, which makes a big difference and the answer to which I don’t know (if you DO know or find out please tell us in the comments).

Filed under: FilemakerTagged with: , , , , ,

Upgrading FileMaker Pro from a Trial Version

FileMaker Pro

So over the weekend I needed to install FileMaker Pro 11 to a customer’s new computer, unfortunately they had misplaced the CD, but total disaster was averted as they had emailed me the serial number when I had first installed FileMaker for them on the old computer.

So my main problem was how to locate a copy of the software so I could install it. I thought this would be relatively simple as I had a .cdr copy of the installation disk stored on one of my hard drives. So I dropboxed it and gave it a couple of hours before I returned.

On my return I discovered how difficult it is to get Windows 7 to deal with certain file types. So .cdr was out, .iso was is. I used one of my customer’s Macs to run the conversion and dropboxed it back to the new PC. Ah, but Windows 7 can’t automatically mount an .iso.

So off to google, found a great little program called PowerISO which will allow you to mount a .iso and more importantly, will do it for free. (Mind you’ll have to note that it created CD Drive mapped to D: which caused us quite a bit of confusion later on…)

So once I had my .iso of FileMaker created and mounted, I discovered to my irritation that I could only find the .mkpg and no .exe. Oh where oh where was the .exe? Despite searching high and low I couldn’t for the life of me find it.

So it was back to the drawing board. And then it occurred to me why not just install the trial version and upgrade it? So off it was to filemakertrial.com to download the Windows trial version. Ten minutes later I had the copy in the downloads folder and ran the installer.

But where to upgrade the trial to full version? Oh wait there is no simple way to do it? Really FileMaker? You couldn’t make it a little easier than buying the full version, downloading it,  uninstalling the trial and re-installing the full copy?

I was sure that there must be an easier way. Especially as I already had a licence but simply no available copy of the Windows version of FileMaker. And I was right. Although FileMaker definitely did not make it easy to find.

So here are the instructions you’ll need: “Converting FileMaker Pro Trial” but remember that you’ll have to uninstall the trial version first and if you need to install more than one copy you’ll have to change the serial number each time before running the setup.exe

Other than that the only thing I think worth pointing out is that I could have downloaded and installed a cracked version of the software in a fraction of the time it took me to figure this out and that is largely due to the truly atrocious FileMaker site search.

Filed under: FilemakerTagged with: , , ,

Record Count in Portal Fields

FileMaker Pro

I used to use this very simple calculation to display a record count in all my solutions:

c_Record_Status

“Record ” & Get(RecordNumber) & ” of ” & Get(FoundCount) & ” ( ” &  Get(TotalRecordCount) & ” total )”

and though it still works in my main layouts in FileMaker 11 it seems to have stopped working in portals, so I had to come up with a new solution and thanks to a post by Daniele Raybaudi over at FileMaker Forums I found a much easier solution:

c_Found_Count_Portal

Get(FoundCount)

which I then compliment on the layout by using the layout shortcut for Get Record Number Symbol or Get Portal Number Symbol: @@. So it is rendered on the page as:

@@  of <<JOIN_Addresses_Companies::c_Found_Count_Portal>>

Which is in itself a much more elegant solution. Oh and remember to set the calculated field to un-stored.

Filed under: FilemakerTagged with: , , ,

FileMaker Custom Messages for Validation Errors

FileMaker Pro

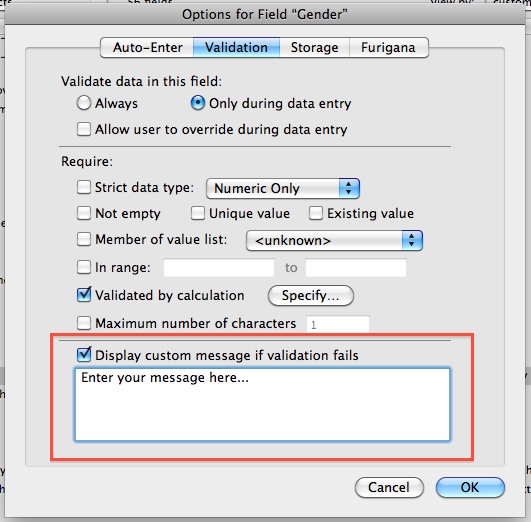
Sometimes you can’t see something because it’s straight in-front of your eyes. So if you’re looking for how to display a custom validation message when validating a field then it’s right at the bottom of the validation pane for that field:

Validation Pane with Custom Notification DialogueAnd yup I had to google to find this out. This is what happens when you have been focusing on your database design for too long!

Unfortunately there is not too much space. So you’re validation message will have to be short but sweet.

Filed under: FilemakerTagged with: , ,

FileMaker Custom Function for File Path to @Dropbox

FileMaker Pro

From the second version of my first database (back in 2002) I have used my FileMaker databases to control the creation of a structured folder system to enable the efficient and uniform storing of structured data for each of the businesses I have worked with.

Early on in my development of FileMaker systems I stumbled across the fantastic plugins offered by Troi Automatisering, in particular their File Plugin, now at version 5, which I will be creating this custom function to use.

This plugin enables me to create, with relative ease, a series of fields and scripts that allowed the automatic creation and opening of folders and files straight from the database. Relatively simple if you’re running FileMaker in a closed network, but it starts to get more complicated very quickly.

I’ve had the good fortune to design almost exclusively for Mac only networks (phew) although I have had to deal with mixed environments where my customers are still in transition from PCs to Macs so I’ve had to ensure that any system is compatible with both.

The Preparation

Determining the Windows System Version:

Since the route to the Documents folder hasn’t ever changed in Mac OS X I don’t need to worry about the version used, however, this is not the case in Windows where there is a different file path to the “My Documents” folder on Windows XP and the new versions Vista and Windows 7.

So I need to use the Get ( SystemVersion ) Function to determine whether or not the user is using Windows XP or a newer version. According to the FileMaker help the function returns the following information for Windows:

5.1 for Windows XP SP2

6.0 for Windows Vista

So I needed a test for which version of Windows is running. I did attempt to design my own custom function to determine this, but perhaps because I was unwell I wasted a good deal of time messing around with this before I came to my senses and looked at Matt’s github page.

His os.versionName custom function (which I’ve renamed as os.versions) is a quick and easy solution to this problem, which can go well beyond my needs, but will achieve what I want by returning the name of the Mac or Windows OS running on the users system.

It returns a simple easy to interpret name from the Get ( SystemVersion ) so the 5.1 response from the function is returned as “Windows XP” or 6.0 is returned as “Windows Vista”.

Dealing with Windows Folder Path Separators:

Windows file paths use the “\” separator. For some reason you can’t easily use these in FileMaker calculations (if someone knows why please let me know in the comments). So I’ve taken the easy step of creation of new global variable $$windowsnetworksymbol to contain the “\” separator.

n.b. To ensure this variable is set each time the FileMaker file is launched I’ve added it to a script called “Set Global Variables”, which I run as part of my start-up script.

Dealing with Mac Folder Path Separators

Mac file paths used by the plugin are formatted with the “:” separator. The only other thing you need to worry about is that a file path starts without any separator.

Get (DocumentsPath) Function

It is the product of this function that we have been working towards editing. The basic idea is to be able to call the Get ( DocumentsPath ) Function and then edit it’s product to point instead to the location of the Dropbox folder (assuming it is installed in the default location).

The Get ( DocumentsPath ) Function will return the following:

\C:\Documents and Settings\YourUserName\My Documents\ in Windows XP

\C:\Users\Your User Name\Documents\ in Vista or Windows 7

And we know from my earlier blog post: Default @Dropbox File Paths that the default file paths for Dropbox are:

\C:\Documents and Settings\YourUserName\My Documents\My Dropbox\ in Windows XP

\C:\Users\YourUserName\Documents\Dropbox\ in Vista or Windows 7

/Macintosh HD/Users/YourUserName/Dropbox/ in Mac OS X

So now we have all the building blocks in place it’s time to construct our custom function:

The path.dropbox Function

The function itself is relatively simple once we have done the above preparation. It has no parameters and is made up of a simple Case Statement which asks two questions:

1. Is the user running a version of Windows XP?

2. Is the user running either Windows Vista or Windows 7?

If both these questions are negative we will assume that the use is running Mac OS X.

Once we have determined which OS the user is using we will then grab the documents file path using the Get ( DocumentsPath ) Function and then reformat it to be compatible with the Troi File Plugin.

Formatting for Windows

We use the Replace Function to make this assessment:

Replace ( Get ( DocumentsPath ); 1; 3; “” )

This will replace the “\C:” part of the resulting Get ( DocumentsPath ) with simply “”.

We encase this Replace Function within a Substitute Function so that we can substitute the “/” separator for the “\” separator contained within our $$windowsnetworksymbol and get a properly formatted Windows file path for the Troi Plugin. So we get:

Substitute ((Replace (Get(DocumentsPath); 1; 3; “”)); [“/”; $$windowsnetworksymbol])

With both Windows File Paths to the Dropbox we then simply need to append the correct location which we can easily do by adding:

& “My Dropbox” & $$windowsnetworksymbol in Windows XP

& “Dropbox” & $$windowsnetworksymbol in Vista or Windows 7

Formatting for Mac

We again use Replace Function to remove the leading “/” and as before encase this within a Substitute Function so that we can substitute the “/” separator for the “:” separator. So we get:

Substitute ((Replace (Get(DocumentsPath); 1; 1; “”)); [“/”; “:”]; [“Documents:”; “”])

As you’ll notice we have also added to the Substitute Function a statement to replace the “Documents:”, which will strip back the Mac File Path to the User so we can then append:

& “Dropbox” & “:”

which will get us to the default location for the Dropbox on the Mac.

The Final Function:

Case (

os.version = “Windows XP 64-Bit” or “Windows XP”; Substitute ((Replace (Get(DocumentsPath); 1; 3; “”)); [“/”; $$windowsnetworksymbol]) & “My Dropbox” & $$windowsnetworksymbol;
os.version = “Windows 7” or “Windows Vista”; Substitute ((Replace (Get(DocumentsPath); 1; 3; “”)); [“/”; $$windowsnetworksymbol]) & “Dropbox” & $$windowsnetworksymbol;
Substitute ((Replace (Get(DocumentsPath); 1; 1; “”)); [“/”; “:”]; [“Documents:”; “”]) & “Dropbox” & “:”

)

Please note that I have not yet had the opportunity to test this on a Windows system, but I’ve followed paths that worked in the past. As soon as I have had the opportunity to test it I will post any corrections here.

Filed under: FilemakerTagged with: , , , , , , , , , , , ,

Default @Dropbox File Paths

So I needed to know the default file paths for dropbox on the Mac and different versions of Windows for a Filemaker Custom Function I’m building and couldn’t find a simple listing anywhere on the internet so if you’re interested here they are:

Default Dropbox location on Mac OS X:

Macintosh HD/Users/YourUserName/Dropbox/ or more quickly ~/Dropbox

Default Dropbox location on Windows XP:

C:\Documents and Settings\YourUserName\My Documents\My Dropbox\

Default Dropbox location on Windows Vista & 7:

C:\Users\YourUserName\Documents\Dropbox\

Source

I found these from the otherwise helpful dropbox Wiki. Check it our here.

Filed under: HelpTagged with: , , , , , , , , ,

Exporting to vCard from FileMaker

FileMaker Pro

FileMaker doesn’t offer the same level of system integration with OS X as it’s little brother Bento, although it offers more power. It is possible, however, with a little work to extract the data you want to use, in the format you need.

The advantage of being able to export a contact to a vCard is obvious. Once you have the vCard you can then import that vCard into Apple Address Book and from there into your iPhone or your Blackberry, pick your poison.

Oh and you can of course export either one contact record or all of the records.

So how do we do it?

A little googling led me to this post by Simon Page which provides an excellent guide on how to achieve this solution via a custom function, without any plugins.

Like Simon I stored the results in an un-stored calculation field and used the linked XSL stylesheet to facilitate the export. You can find a link to the standard stylesheet here.

My adjustments

I have adjusted his custom function, which I’ve named (following my conventions) export.vcard to add the following available fields in the vCard:

NICKNAME

This is simple enough to achieve:

Add the parameter:

AKA

Add this to the variables:

_Nickname = AKA;

Add this to the formatting for the vCard:

vnickname = _Nickname;

Add this to the final formatting:

“NICKNAME:” & vnickname & “¶” &

PHOTO

I’ve tried this with a series of combinations of the above, with images held in the file as well as stored with a reference to no effect. So I decided to take a look at a vCard from Apple Address Book with TextMate only to discover it’s encoded in base64. So for the moment I’m stuck, but I’ve a few leads, and I’ll update once I’ve found a solution.

BDAY

This is a little more complicated to achieve. You must export the date field in the right format. Here in the UK we format our dates as DD/MM/YYYY but for it to work with the vCard format it needs to be formatted as YYYY/MM/DD, so I created the following custom un-stored calculation field: c_Formatted_Date_of_Birth.

Rather than perform the calculation in the field I heading over to Brian Dunning’s site again and picked out a suitable custom function to allow me to reformat the date I had in my Date_of_Birth field. I chose this one penned by Tim Anderson. And I was able to provide the date in the format I needed. Then I just needed to:

Add the parameter:

DOB

Add this to the variables:

_BDAY = DOB;

Add this to the formatting for the vCard:

vbday = _BDAY;

Add this to the final formatting:

“BDAY:” & vbday & “¶” &

Updates

I’ve not yet completed my final vCard export routine so I’ll update this blog post with more information as I build out the new database. So check back for more.

Filed under: FilemakerTagged with: , , , , , , ,

FileMaker Custom Function for Initials

FileMaker Pro

So in my last blog post you’ll of noticed that I used a custom function called format.initials. I used the function in my calculated field: c_Postal_Name so that I could extract the initials from a name.

Custom functions are a great way to reuse FileMaker code again and perform the same function on multiple fields. There are some great resources out there to help you get started with custom functions, my favourite of which is the custom function section on Brian Dunning’s site (see here).

Rather than re-invent the wheel it is often possible to take someone elses code and adapt it for your own use. In this instance I took a custom function by Ray Cologon of NightWing Enterprises, designed to calculate Acronyms.

Apart from renaming it to suit my naming convention (I name all custom functions by their function, so Ray’s Acronym Function became format.acronym) I just added

& “. “

to the function in each section of the loop and my format.initials custom function was born.

So here it is:

format.initials (name)

/*
Adapted from http://www.briandunning.com/cf/33
*/
If (
WordCount (name) > 1;
Upper ( Left (name; 1)) & “. ” &
format.initials ( RightWords ( name; WordCount (name) -1));
Upper ( Left ( name; 1 )) & “. “
)

You’ll also note that I’ve added a reference to the original custom function I’ve adapted so that it’s properly credited and if I need to reference the original again a few months down the line I can easily do so.

Oh and one note of caution here. If you want to make use of custom functions you’ll need FileMaker Pro Advanced.

Filed under: FilemakerTagged with: ,